비인증결제 연동하기
비인증 결제란?
카드 정보를 미리 등록해두고 원하는 때에 고객의 별도 인증 없이 결제를 요청하는 방식을 통칭합니다. 구매자의 인증 없이도 결제를 진행할 수 있어 간편하다는 장점이 있지만 구매자 인증 과정이 생략되는만큼 서비스 운영 중 보안상의 이슈가 발생할 확률이 높아 PG 가입 시 입점심사가 까다롭게 진행된다는 점은 참고해주세요.
1. 빌링키 결제
최초 등록된 결제정보로 "반복적"인 결제가 이루어지는 방식 넷플릭스 또는 애플뮤직 정기 구독 서비스 이용 시 첫달에 카드정보를 입력한 후 매달 자동적으로 결제를 일으키고 싶은 경우 해당 방식을 이용합니다.
2. 키인결제
구매자 인증 없이 카드번호 입력만으로 결제되는 방식 (일회성 결제) 키인(수기) 결제는 카드 정보를 입력하는 것만으로 별도 인증절차 없이 결제가 이루어지는 방식입니다. 결제는 일회성으로 진행되며 카드정보를 저장하지 않기 때문에 결제할 때마다 카드정보를 입력해주셔야 합니다.
빌링키 발급
결제창을 이용한 빌링키 발급
PG사에서 제공하는 결제창을 이용하여 빌링키를 획득합니다
PG사가 제공하는 일반 결제창에 고객이 카드정보를 입력하여 빌링키를 발급 받을수 있습니다.
장점: 카드정보가 서버 또는 아임포트의 서버를 거치지 않고 직접 PG사로 전달되기 때문에 데이터 및 통신구간 암호화 등의 추가 보안 프로세스가 없다.
단점: PG사의 일반결제창을 통해 카드정보를 입력받기 때문에 웹브라우저를 통해서만 빌링키 발급이 이루어지며, 카드정보 입력란을 커스터마이징 할 수 없다. (가맹점 사이트 친화적인 UI/UX 구성불가)

발급 요청하기
인증결제와 동일하게 JavaScript SDK 를 이용하여 PG사 결제창을 호출합니다. 빌링키를 획득하기 위해서는 requestIssueBillingKey 함수를 이용해야 하며, 파라미터를 적절히 설정하여 함수를 호출하면 결제창을 열 수 있습니다.
PORT.requestIssueBillingKey(
  {
    /* ...생략... */
  },
  function (rsp) {
    // callback
    if (rsp.isSuccess) {
      // 빌링키 발급 성공
    } else {
      // 빌링키 발급 실패
    }
  }
);
발급 응답 처리하기
PORT.requestIssueBillingKey(
  {
    /* ...중략... */
  },
  function (rsp) {
    // callback
    if (rsp.success) {
      // 빌링키 발급 성공
      fetch("{customer_uid를 받을 서비스 URL}", {
        method: "POST",
        headers: { "Content-Type": "application/json" },
        body: JSON.stringify({
          data: {
            billingKey: rsp.billingKey,
          },
        }),
      });
    } else {
      // 빌링키 발급 실패
    }
  }
);
빌링키가 성공적으로 발급되면 가맹점 서버로 billingKey 를 전달합니다. 서버에서는 클라이언트로부터 billingKey를 전달받는 API endpoint를 생성합니다. 서버에서 해당 billingKey 를 사용하여 차후에 결제를 요청할 수 있습니다.
app.post("/billings", async (req, res) => {
  try {
    const { billingKey } = req.body; // req body에서 billingKey 추출
      ...
  } catch (e) {
    res.status(400).send(e);
  }
});
전달받은 billingKey 를 가맹점 내부서버 DB에 저장 후 추후 해당 정보를 이용하여 결제를 요청 합니다.
빌링키 결제 요청하기
위에서 저장된 billingKey 를 이용하여 차이포트 **비 인증 결제(빌링키)API**를 호출하여 결제를 요청합니다.
REST API 를 이용하기 위해서는 Access Token 획득이 선행되어야 하는점 잊지 마세요
app.post("/billings", async (req, res) => {
  try {
    const { billingKey } = req.body; // req의 body에서 billingKey 추출
    // 인증 토큰 발급 받기
    const getToken = await axios({
      url: "https://api.iamport.kr/v2/signin/api-key",
      method: "post", // POST method
      headers: { "Content-Type": "application/json" },
      data: {
        api_key: "ekKoeW8RyKuT0zgaZsUtXXTLQ4AhPFW3ZGseDA6bkA5lamv9OqDMnxyeB9wqOsuO9W3Mx9YSJ4dTqJ3f" // REST API Key
      }
    });
    const { access_token } = getToken.data.response; // 인증 토큰
    ...
    // 빌링키 결제 요청
    cosnt payment_id = ??? // 결제를 위한 가맹점의 고유 주문번호

    const paymentResult = await axios({
      url: `https://api.iamport.kr/v2/payments/${payment_id}/billing-key/pay:`,
      method: "post",
      // 인증 토큰을 Authorization header에 추가
      headers: { "Authorization": access_token },
      data: {
        billingKey,
        name: "월간 이용권 정기결제"
        totalAmount: 8900,
        customer: {
          customerId: "string",
          phoneNumber: "string",
          customerName: { fullName: "abc" },
          email: "string",
          zipcode: "string",
          address: "string"
        },
        currency: "KRW"
      }
    });
    ...
    res.send({ ... });
  } catch (e) {
    res.status(400).send(e);
  }
});
API를 이용한 빌링키 발급
아임포트 REST API 를 이용하여 손쉽게 빌링키를 획득할수 있습니다.
아임포트 REST API 를 이용하여 빌링키를 획득하여 결제를 요청할 수 있습니다. 고객 카드정보를 이용하여 빌링키 발급을 요청하면 아임포트 서버가 PG사의 API를 호출하여 빌링키를 발급받습니다. 이 과정에서 카드정보는 기록되지 않습니다.이 방식은 다음과 같은 특징이 있습니다.
장점: 가맹점이 원하는 형태의 화면으로 카드정보 입력란을 커스터마이징할 수 있다.
단점: 개인정보 이용약관을 명시해야 하며 PG사 및 카드사 심사가 까다롭고 개인정보 유출에 유의해야 합니다.
가맹점 UI/UX 친화적인 결제 환경을 계획하고 계시다면 API 연동 개발을 선택하시면 됩니다.
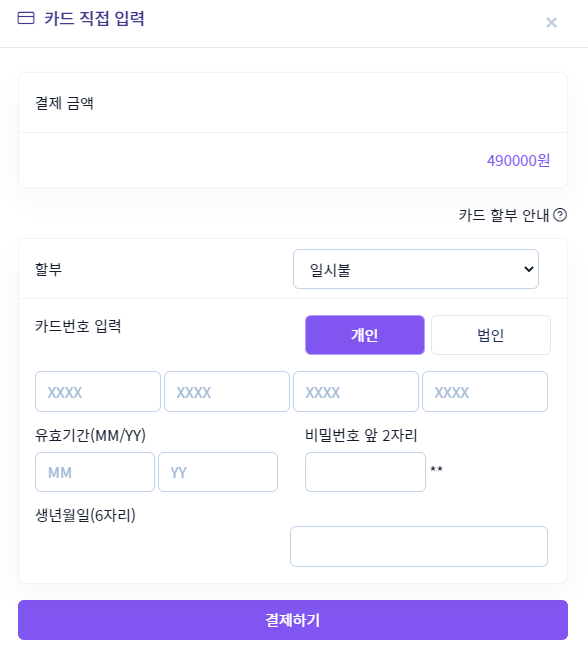
STEP 01. 카드 정보 입력받기
카드 정보를 입력하는 필드들을 다음과 같이 작성합니다. 법인카드(개인명의로 발급된 기명카드 제외)의 경우
birthOrBusinessRegistrationNumber 파라미터에 사업자번호 10자리를 입력하시면 됩니다.
결제하기 버튼 클릭 시 입력 값들로 /billing-keys에 대해 POST요청이 호출되는 예제입니다.
빌링키 발급을 위한 카드정보
- 카드번호
- 유효기간(년/월)
- 생년월일
- 비밀번호 앞 두자리
// React.js
class CardForm extends React.Components {
  constructor(props) {
    super(props);
    this.state = {
      cardNumber: "string",
      expiryMonth: "string",
      expiryYear: "string",
      birthOrBusinessRegistrationNumber": "string",
      password2Digits: "string"
    }
  }
  ...
  handleInputChange = (event) => {
    const { value, name } = event.target;
    this.setState({
      [name]: value,
    });
  };
  ...
  handleFormSubmit = (event) => {
    event.preventDefault();
    const { cardNumber, expiryMonth, expiryYear, birthOrBusinessRegistrationNumber, password2Digits } = this.state;
    axios({
      // 예: https://www.myservice.com/subscription/issue-billing
      url: "{빌링키 발급 요청을 받을 서비스 URL}",
      method: "post",
      data: {
        cardNumber,
        expiryMonth,
        expiryYear,
        birthOrBusinessRegistrationNumber,
        password2Digits
      }
    }).then(rsp => {
      ...
    });
  };
  ...
  render() {
    const { cardNumber, expiryMonth, expiryYear, birthOrBusinessRegistrationNumber, password2Digits } = this.state;
    return (
      <form onSubmit={this.handleFormSubmit}>
        <label>
          카드 번호
          <input type="text" name="cardNumber" value={cardNumber} onChange={this.handleInputChange} />
        </label>
        <label>
          카드 유효기간(년)
          <input type="text" name="expiry" value={expiryYear} onChange={this.handleInputChange} />
        </label>
        <label>
          카드 유효기간(월)
          <input type="text" name="expiry" value={expiryMonth} onChange={this.handleInputChange} />
        </label>
        <label>
          생년월일
          <input type="text" name="birth" value={birthOrBusinessRegistrationNumbe} onChange={this.handleInputChange} />
        </label>
        <label>
          카드 비밀번호 앞 두자리
          <input type="text" name="pwd2Digit" value={password2Digits} onChange={this.handleInputChange} />
        </label>
        <input type="submit" value="결제하기" />
      </form>
    )
  }
}
카드 정보 추출하기
카드 정보를 전달받을 API endpoint를 작성하고 요청에 담긴 카드 정보를 추출합니다.
/subscription/issue-billing에 대한 POST요청을 처리하는 API endpoint의 예제입니다.
// "/subscription/issue-billing"에 대한 POST 요청을 처리
app.post("/subscriptions/issue-billing", async (req, res) => {
  try {
    const {
      cardNumber,
      expiryMonth,
      expiryYear,
      birthOrBusinessRegistrationNumber,
      password2Digits
    } = req.body; // req의 body에서 카드정보 추출
    ...
  } catch (e) {
    res.status(400).send(e);
  }
});
빌링키 발급 요청 및 응답 처리하기
당사가 제공하는 **빌링키 발급 REST API** 를 통해 빌링키 발급을 요청하고 결과값에 따라 응답을 반환하는 예제입니다.
// "/subscription/issue-billing"에 대한 POST 요청을 처리
app.post("/subscriptions/issue-billing", async (req, res) => {
  try {
    const {
      cardNumber,
      expiryMonth,
      expiryYear,
      birthOrBusinessRegistrationNumbe,
      password2Digits
    } = req.body; // req의 body에서 카드정보 추출
    ...
    // 인증 토큰 발급 받기
    const getToken = await axios({
      url: "https://api.iamport.kr/v2/signin/api-key",
      method: "post",          // POST method
      headers: { "Content-Type": "application/json" },
      data: {
        api_key: "ekKoeW8RyKuT0zgaZsUtXXTLQ4AhPFW3ZGseDA6bkA5lamv9OqDMnxyeB9wqOsuO9W3Mx9YSJ4dTqJ3f" // REST API Key
      }
    });
    const { access_token } = getToken.data.response; // 인증 토큰
    ...
    // 빌링키 발급 요청
    const issueBilling = await axios({
      url: `https://api.iamport.kr/v2/billing-keys`,
      method: "post",
      // 인증 토큰 Authorization header에 추가
      headers: { "Authorization": access_token },
      data: {
        payment_method_option: {
          card: {
            card_credential: {
              cardNumber,
              expiryMonth,
              expiryYear,
              birthOrBusinessRegistrationNumber,
              password2Digits
            }
          }
        }
      }
    });
    ...
    res.send({ status: "success", message: "Billing has successfully issued" });
  } catch (e) {
    res.status(400).send(e);
  }
});
REST API 를 이용하기 위해서는 Access Token 획득이 선행되어야 하는점 잊지 마세요
빌링키를 이용한 정기 결제
billing_key 로 정기(예약)결제 구현방법을 안내합니다.
빌링키 발급 과정을 거쳐 billing_key 를 획득했다면 원하는 형태의 정기 또는 예약결제를 이용할 수 있습니다.
STEP 01. 결제 예약하기
미래 특정 시점에 결제가 진행되도록 결제를 예약할 수 있습니다. 차이포트 결제 예약 API를 이용하여 원하시는 시점에 결제 예약을 손쉽게 등록 할 수 있습니다.
// 결제 예약
const payment_id = "order_monthly_0001", // 주문 번호

axios({
  url: `https://api.iamport.kr/v2/payments/${payment_id}/schedules`,
  method: "post",
  headers: { "Authorization": access_token },
  data: {
    "billingKey": "gildong_0001_1234", // 아임포트로부터 발급받은 빌링키
    "orderName": "월간 이용권 정기결제",
    "customer": {
      "customerId": "customer-id",
      "phoneNumber": "010-1234-1234",
      "customerName": {
        "fullName": "customer-name"
      },
      "email": "customer-email@iamport.kr",
      "zipcode": "customer-ziocode",
      "address": "customer-address"
    },
    "totalAmount": 8900,
    "currency": "KRW",
    "scheduledAt": "2019-08-24T14:15:22Z" // 결제를 시도할 시각
  }
});
결제 결과 수신받기
예약한 시간에 결제가 시도되면 Webhook 이벤트가 발생하여 지정한 서버의 callback URL로 결제 번호(tx_id)와 주문 번호(payment_id)가 전달됩니다. 웹훅으로 예약결제에 대한 결과를 수신하면 결제결과 완료 로직 처리를 진행하시면 됩니다.
아임포트 Webhook
아임포트 Webhook의 개념과 URL 설정 방법은 아임포트 Webhook 문서를 참고하세요.
// "/iamport-callback/schedule"에 대한 POST 요청을 처리
app.post("/iamport-callback/schedule", async (req, res) => {
  try {
    const { tx_id, payment_id } = req.body;
    // 액세스 토큰(access token) 발급 받기
    const getToken = await axios({
      url: "https://api.iamport.kr/v2/signin/api-key",
      method: "post", // POST method
      headers: { "Content-Type": "application/json" },
      data: {
        api_key: "ekKoeW8RyKuT0zgaZsUtXXTLQ4AhPFW3ZGseDA6bkA5lamv9OqDMnxyeB9wqOsuO9W3Mx9YSJ4dTqJ3f"
      }
    });
    const { access_token } = getToken.data.response; // 인증 토큰

    // payment_id로 아임포트 서버에서 결제 정보 조회
    const getPaymentData = await axios({
      url: `https://api.iamport.kr/v2/payments/${payment_id}`, // payment_id 전달
      method: "get", // GET method
      headers: { "Authorization": access_token }
    });

    const paymentData = getPaymentData.data.response; // 조회한 결제 정보
    const transaction = paymentData.transactions.filter(transaction => paymentData.primary_tx_id === tx_id)[0]

    const { status } = transaction;
    if (status === "PAID") { // 결제 성공적으로 완료
      // DB에 결제 정보 저장
      await Orders.findByIdAndUpdate(payment_id, { $set: paymentData }); // Mongoose
      ...
    } else {
      // 재결제 시도
    }
  } catch (e) {
    res.status(400).send(e);
  }
});
반복결제 구현하기
아임포트 서버에 결제 예약 요청을 하고 예약한 시간에 결제가 시도되면 지정된 웹훅 URL을 통해서 서버에 알리는 과정을 반복적으로 수행하여 반복 결제를 구현할 수 있습니다.
(이미지에 url들 조금 수정돼야 할 듯)

예약된 결제가 시도되었을 때 발생하는 webhook 이벤트를 처리하는 로직에서 예약된 결제가 정상적으로 완료되고 결제 내역이 저장되면 다음 결제를 예약하는 예제입니다.
// "/iamport-callback/schedule"에 대한 POST 요청을 처리
app.post("/iamport-callback/schedule", async (req, res) => {
  try {
    const { tx_id, payment_id } = req.body;
    // 액세스 토큰(access token) 발급 받기
    /* ...중략 ... */
    // payment_id로 아임포트 서버에서 결제 정보 조회
    /* ...중략 ... */
    const paymentData = getPaymentData.data.response; // 조회한 결제 정보
    const transaction = paymentData.transactions.filter(transaction => paymentData.primary_tx_id === tx_id)[0]

    const { status } = transaction;
    if (status === "PAID") { // 결제 성공적으로 완료
      // DB에 결제 정보 저장
      await Orders.findByIdAndUpdate(payment_id, { $set: paymentData });
      ...
      // 새로운 결제 예약
      axios({
        url: `https://api.iamport.kr/v2/payments/${payment_id}/schedules`,
        method: "post",
        headers: { "Authorization": access_token },
        data: {
          "billingKey": "gildong_0001_1234", // 아임포트로부터 발급받은 빌링키
          "orderName": "월간 이용권 정기결제",
          "customer": {
            "customerId": "customer-id",
            "phoneNumber": "010-1234-1234",
            "customerName": {
              "fullName": "customer-name"
            },
            "email": "customer-email@iamport.kr",
            "zipcode": "customer-ziocode",
            "address": "customer-address"
          },
          "totalAmount": 8900,
          "currency": "KRW",
          "scheduledAt": "2019-08-24T14:15:22Z" // 결제를 시도할 시각
        }
      });
    } else {
      // 재결제 시도
    }
  } catch (e) {
    res.status(400).send(e);
  }
});
카드 정보를 이용한 키인 결제
구매자 인증 없이 카드번호 입력만으로 결제가 가능합니다.
PG사와 협의가 된 경우 카드정보를 이용하여 1회성 결제요청이 가능합니다. 해당방식은 매번 카드정보를 기입하여 결제를 요청하는 방식으로 주로 ARS를 통해 고객분께 카드 정보를 획득하여 결제를 요청하는 콜센타 또는 인증결제의 번거로움을 회피하기 위해 일부 가맹점에서 사용하는 방식입니다. 최근에는 인증결제가 간편결제방식으로 전환되면서 매번 카드정보를 기입해야 하는 번거로움 때문에 많이 사용되지 않은 방식입니다.
(차이포트 이용 가맹점 "링글 잉글리시 에듀케이션")
키인결제를 이용하기 위해서는 PG사와 협의가 필요합니다.
키인결제는 비인증 결제(1회성) API 또는 PG창을 이용하여 결제를 요청할 수 있습니다.